
One of my favorite things about StartOS from Start9 is the attention paid to privacy. On your local network the Services (apps) are secured by using https and hidden behind complex URLs so that they can’t be discovered.
On the internet these Services run safely behind Tor (entirely in most cases, should you configure them that way) and again are impossible to find thanks to randomly generated Tor onion addresses.
When running Services on StartOS behind Tor, in particular leaky Lightning software, no-one is going to be able to work out where you’re geographically located. Your privacy is protected by Tor and your IP address isn’t exposed.
But for some this focus on privacy can get in the way of practical day to day use of these pieces of software. Tor leaves you unreachable to the hoards of normies on clearnet, and it stops you in your tracks when client software you use doesn’t support it.
The upcoming release of StartOS v0.4.0 will open up many avenues to reach your Services over clearnet… avoiding all the hacked together solutions people are using… but Tor, due to its very nature, is always going to be regarded as something of an ultimate guarantor of privacy and you might still want to use it.
For now, a Reverse Proxy setup is going to be the only way to reach your services over clearnet but passed through Tor. This opens up the ability for many fun weekend projects, but in this guide we’ll focus on…
- Allowing you to run BTCPay Server, and being able to connect to it from clearnet websites such as your ecommerce system.
- Setting up a Lightning Address, a familiar email-like string that can be entered into many lightning wallets so that people can send you sats.
- Activate self-custody zapping on Nostr so that zaps go straight to your node.
- Running LNbits so you can have a segregated lightning wallet separate from the bulk of your funds.
- Hosting lightning wallets for non-sovereign friends and family who can’t or don’t want to use Tor.
- Use plugins on LNbits, such as Point of Sale applications.
- Use Bolt Cards, both the plugin on LNbits and importantly, have a clearnet URL to write onto the physical cards themselves.
There’ll be more that you can do, and variations to the above, but we’ll follow this setup because it shows you how to reverse proxy multiple Services on StartOS as well as opens up more options for fun by having both BTCPay Server and LNbits accessible.
Step 1 - The VPS
We’ll need a 3rd party to run our Virtual Private Server, a publicly accessible linux server that will run 24/7 to respond to requests and route them to our home Start9 server through Tor.
Lunanode wins praise for its simple credit top-up system, basic interface and the ability to pay with Bitcoin. That last one is useful because it will allow us to add an extra layer of privacy to our setup. So we’ll use Lunanode for this guide.
- Signup to Lunanode with a Protonmail address, select a country of residence where you can easily get a virtual phone number that isn’t easily detected as one, and deposit $10 of bitcoin via their payment options. When asked, add the phone number. Alternatively, sign up and pay in a less-private way.
- Select to Create VM. Choose a region. Add a hostname (perhaps one that will eventually be your domain name) and select the cheapest plan.
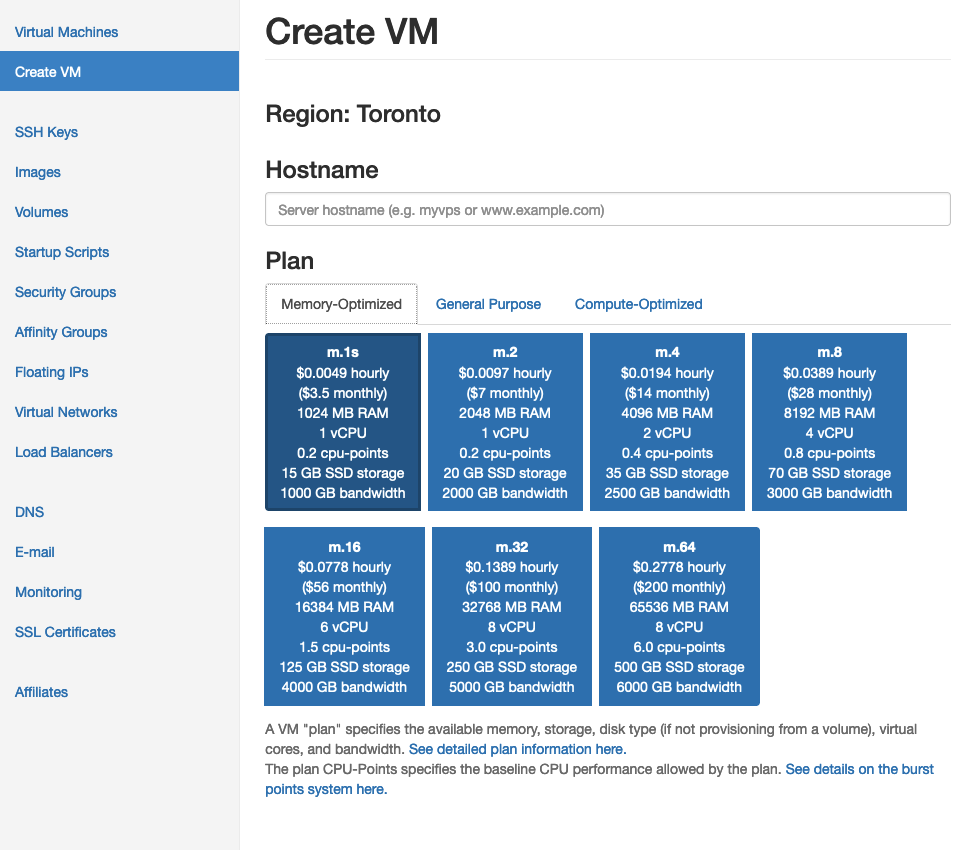
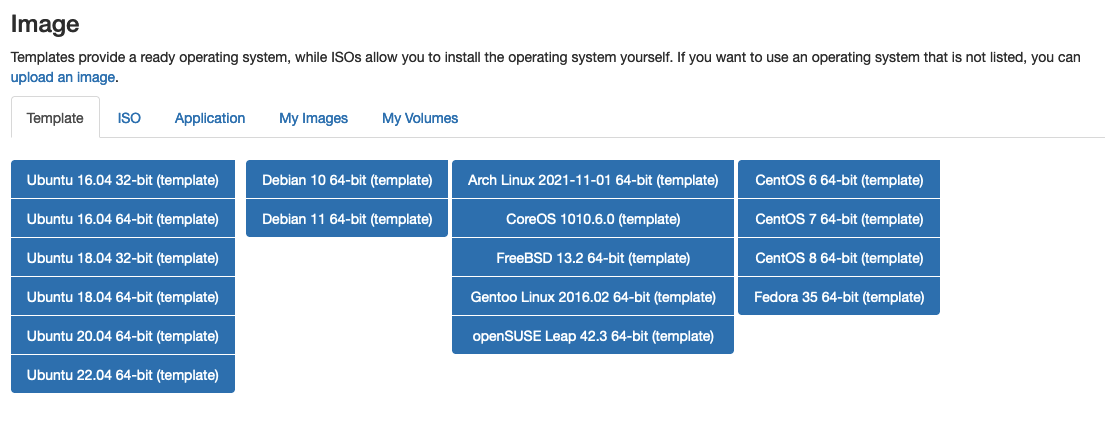
- Work with Debian, and use Debian 12.
Once built, you’ll be given access to your virtual machine. Details you’ll be interested in are:
i) External IP address (for your domain’s A records)
ii) Optionally your IPv6 address (for your domain’s AAAA records)
iii) Your initial login details (i.e. debian, and a string.
Under the rDNS tab, you’ll also find the hostname, the reverse of your external IP and lunanode-rdns.com (possibly useful for CNAME records)
Step 2 - The Domain Name
Again, in this guide we’ll use Bitcoin as a means to pay for services, providing little to no personal information to our providers. An option for domain names is Namecheap, who offer a bitcoin and lightning payment option. Again on a credit top-up basis.
Another reason to choose them is that they offer a free email redirection service. It’s not a good service – people complain that emails are sometimes erroneously blocked as spam, but it does mean that if someone decided to email your lightning address, you’ll likely get it forwarded to you.
Choose a budget friendly inexpensive top level domain name if you are a plebeian, or an expensive fancy one if you are a patrician. I chose the cheapest at the time because I’m a pleb.
Once your domain is registered, you can click into Manage it.
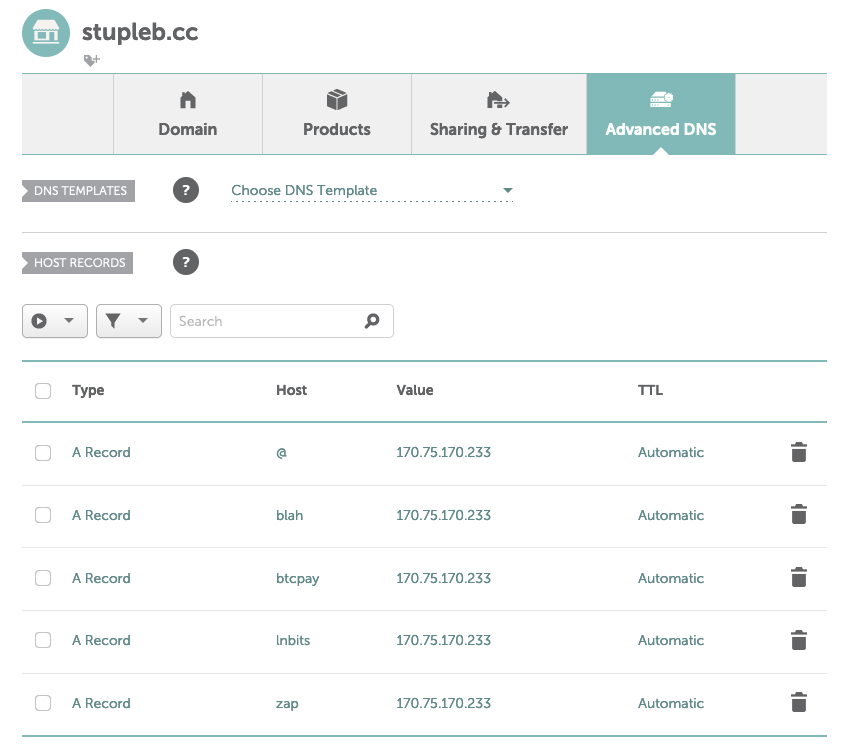
You’ll need to go to Advanced DNS. Here you’ll need to create A Records for each service you plan to reverse proxy. You’ll point your preferred subdomain host to the external IP address provided by Lunanode.
You can create as many of these as you like, even if you don’t end up using them. You can also create multiple for the same Start9 Service, but that creates more work later. You can also name them whatever you like, they don’t need to match the service name at all.
At a minimum, you’ll probably want to create:
@ → IP (this will point the root of the domain, i.e. “stupleb.cc” to the VPS)
btcpay → IP (we’ll be using this)
lnbits → IP (we’ll also be using this)
This will give us…
- stupleb.cc
- btcpay.stupleb.cc
- lnbits.stupleb.cc
…to work with.
Step 3 - Configuring the tunnels on the VPS
Most of the work we’re going to be doing is on the VPS itself, via the command line. We’ll follow most of BTCPay Server’s reverse-proxy guide, but we’ll adapt it and pad it out a bit so as to make the process a little easier when considering reverse-proxying multiple Services.
Let’s login to our new Debian 10 Lunanode server.
ssh debian@x.x.x.x.lunanode-rdns.com
You’ll be asked to enter the password visible on your VM’s dashboard under ‘General’.
Once in, you’ll need to switch to root and install the dependencies we need.
sudo su -
then
apt update && apt install -y certbot nginx socat tor
You’ll see from above that we need:
- Certbot - to request and assign SSL certificates from Let’s Encrypt, so we can use https
- Nginx - to run a webserver to respond to and handle web requests over http/s
- Socat - the service we run continuously in the background that makes the connection and handles the forwarding between Nginx and the Tor service running
- Tor - so we can connect to the Tor network
Next we create a service file for socat so it has the configuration needed to run, with variables set to allow us to plug in multiple services with different individual configurations.
nano /etc/systemd/system/http-to-socks-proxy@.service
To this file we’ll add:
[Unit]
Description=HTTP-to-SOCKS proxy
After=network.target[Service]
EnvironmentFile=/etc/http-to-socks-proxy/%i.conf
ExecStart=/usr/bin/socat tcp4-LISTEN:${LOCAL_PORT},reuseaddr,fork,keepalive,bind=127.0.0.1 SOCKS4A:${PROXY_HOST}:${REMOTE_HOST}:${REMOTE_PORT},socksport=${PROXY_PORT}[Install]
WantedBy=multi-user.target
We’ll ctrl-o and ctrl-x to write the file and quit nano.
Now we’ll create the files with the values that will feed into the service file.
Let’s make a directory for the files to live:
mkdir /etc/http-to-socks-proxy
 This is the part of the guide you’ll come back to and continue down from when you want to expose your third or forth Service.
We’ll create one for each StartOS Service we want to reverse-proxy. Let’s do LNbits and BTCPay.
Let’s create a file for BTCPay
nano /etc/http-to-socks-proxy/btcpayserver.conf
And add the values.
PROXY_HOST=127.0.0.1
PROXY_PORT=9050
LOCAL_PORT=9081
REMOTE_HOST=heregoesthebtcpayserverhiddenserviceaddress.onion
REMOTE_PORT=80
Things to pay attention to here…
Your webserver will listen on port 80 (web) for requests that it will forward to socat listening on ‘LOCAL_PORT’. Socat will then feed this through port 9050 (tor) to your Start9 Service with a web UI on port 80.
So if running multiple socat services, you’ll need to assign a different local port for each one. We’ll use 9081 for BTCPay, 9082 for LNbits and so on.
Let’s create the next one for LNbits.
nano /etc/http-to-socks-proxy/lnbits.conf
And add the values.
PROXY_HOST=127.0.0.1
PROXY_PORT=9050
LOCAL_PORT=9082
REMOTE_HOST=heregoesthelnbitshiddenserviceaddress.onion
REMOTE_PORT=80
Now we have two service configs ready to go, let’s link them to our socat service, name them and run them.
ln -s /etc/systemd/system/http-to-socks-proxy\@.service /etc/systemd/system/multi-user.target.wants/http-to-socks-proxy\@btcpayserver.service
ln -s /etc/systemd/system/http-to-socks-proxy\@.service /etc/systemd/system/multi-user.target.wants/http-to-socks-proxy\@lnbits.service
Now let’s start them
systemctl start http-to-socks-proxy@lnbits
systemctl start http-to-socks-proxy@btcpayserver
You can check they are running with
systemctl status http-to-socks-proxy@btcpayserver
or
systemctl status http-to-socks-proxy@lnbits
We can check if the tunnel is active with
netstat -tulpn | grep socat
For the above, you should see two results, one on port 9081 and another on 9082.
Step 4 - Configuring the webserver on the VPS
We now have our StartOS Services connected to clearnet via our VPS, but no way to route requests through from one to the other. To do this, we’ll set up nginx and some rules.
Before we begin, let’s lay some groundwork.
We do this just once, for all Start9 Services, so if you’re reading this guide later and have previously done this skip to ‘Setting up each Service’
openssl dhparam -out /etc/ssl/certs/dhparam.pem 4096
mkdir -p /var/lib/letsencrypt/.well-known
chgrp www-data /var/lib/letsencrypt
chmod g+s /var/lib/letsencrypt
This allows us to later set up SSL certificates to accept https requests correctly.
nano /etc/nginx/conf.d/map.conf
Add…
map $http_x_forwarded_proto $proxy_x_forwarded_proto {
default $http_x_forwarded_proto;
''$scheme;
}map $http_upgrade $connection_upgrade {
default upgrade;
''close;
}
Ctrl-o, ctrl-x
Setting up each Service
Now we’re ready to set up a configuration file for each StartOS Service. We create a separate file for each Service for clarity since we already created a separate systemctl service for each one. Knowing that you have one systemctl service config file for each Service, and also one nginx config file for each should make things clearer.
We’ll create each file, configure for http, generate a certificate, then edit the config file again to add the https configuration.
Let’s do BTCPay Server first.
nano /etc/nginx/sites-available/btcpayserver.conf
Add…
server {
 listen 80;
 server_name btcpayserver.stupleb.cc;

 # Let's Encrypt verification requests
 location ^~ /.well-known/acme-challenge/ {
  allow all;
  root /var/lib/letsencrypt/;
  default_type "text/plain";
  try_files $uri =404;
 }

 # Redirect everything else to https
 location / {
  return 301 https://$server_name$request_uri;
 }
}
Take care to replace that first server_name’s value of “btcpayserver.stupleb.cc” with the correct subdomain and domain name for your BTCPay. It MUST be the one you set up in your A records on Namescheap.
Ctrl-o, ctrl-x
We’ll now place this in the enabled sites directory with a symbolic link so nginx can see and use it.
ln -s /etc/nginx/sites-available/btcpayserver.conf /etc/nginx/sites-enabled/btcpayserver.conf
Restart nginx…
systemctl restart nginx
Let’s obtain an SSL certificate from Let’s Encrypt
certbot certonly --agree-tos --email youremail@yourdomain.cc --webroot -w /var/lib/letsencrypt/ -d btcpayserver.stupleb.cc
Take care to replace with btcpayserver.stupleb.cc with the correct subdomain and domain name. The email address too.
This should correctly obtain and store a certificate which lasts for 90 days. Take note! You’ll need to run this same command 89 days from now. Don’t forget. Mark it in a calendar.
We now head back to our nginx config file for BTCPay Server…
nano /etc/nginx/sites-available/btcpayserver.conf
…and add the https configuration below the previous one…
server {
 listen 443 ssl http2;
 server_name btcpayserver.stupleb.cc;

 # SSL settings
 ssl_stapling on;
 ssl_stapling_verify on;
 ssl_session_timeout 1d;
 ssl_session_cache shared:SSL:10m;
 ssl_session_tickets off;

 # Update this with the path of your certificate files
 ssl_certificate /etc/letsencrypt/live/btcpayserver.stupleb.cc/fullchain.pem;
 ssl_certificate_key /etc/letsencrypt/live/btcpayserver.stupleb.cc/privkey.pem;

 ssl_dhparam /etc/ssl/certs/dhparam.pem;
 ssl_protocols TLSv1.2 TLSv1.3;

 ssl_ciphers ECDHE-ECDSA-AES128-GCM-SHA256:ECDHE-RSA-AES128-GCM-SHA256:ECDHE-ECDSA-AES256-GCM-SHA384:ECDHE-RSA-AES256-GCM-SHA384:ECDHE-ECDSA-CHACHA20-POLY1305:ECDHE-RSA-CHACHA20-POLY1305:DHE-RSA-AES128-GCM-SHA256:DHE-RSA-AES256-GCM-SHA384;

 ssl_prefer_server_ciphers off;
 resolver 8.8.8.8 8.8.4.4 valid=300s;
 resolver_timeout 30s;

 add_header Strict-Transport-Security "max-age=63072000" always;
 add_header Content-Security-Policy "frame-ancestors 'self';";
 add_header X-Content-Type-Options nosniff;

 # Proxy requests to the socat service
 location / {
  proxy_pass http://127.0.0.1:9081/;
  proxy_http_version 1.1;
  proxy_set_header Host $host;
  proxy_set_header X-Real-IP $remote_addr;
  proxy_set_header X-Forwarded-For $remote_addr;
  proxy_set_header X-Forwarded-Proto $proxy_x_forwarded_proto;
  proxy_set_header Upgrade $http_upgrade;
  proxy_set_header Connection $connection_upgrade;
 }
}
In the above you have a few things to pay attention to. You have three instances where you have to swap out my domain for yours. You then have to make sure that the local port for your socat service is set correctly.
My BTCPay Server, has a… LOCAL_PORT=9081
…for example, whereas my LNbits is at… LOCAL_PORT=9082
When set correctly, you can…
systemctl restart nginx
If you get an error, go back and make sure the nginx config file is typo free. If you need to you can run
sudo nginx -t
To check if your config has errors before you restart nginx.
Next, we’ll repeat this process for LNbits.
Again, from the top…
nano /etc/nginx/sites-available/lnbits.conf
Add…
server {
 listen 80;
 server_name lnbits.stupleb.cc;

 # Let's Encrypt verification requests
 location ^~ /.well-known/acme-challenge/ {
  allow all;
  root /var/lib/letsencrypt/;
  default_type "text/plain";
  try_files $uri =404;
 }

 # Redirect everything else to https
 location / {
  return 301 https://$server_name$request_uri;
 }
}
Swap lnbits.stupleb.cc for the subdomain and domain you created an A record for.
Ctrl-o, ctrl-x
We’ll also place this in the enabled sites directory with a symbolic link so nginx can see and use it.
ln -s /etc/nginx/sites-available/lnbits.conf /etc/nginx/sites-enabled/lnbits.conf
Restart nginx…
systemctl restart nginx
Let’s obtain an SSL certificate from Let’s Encrypt, this time for LNbits…
certbot certonly --agree-tos --email youremail@yourdomain.cc --webroot -w /var/lib/letsencrypt/ -d lnbits.stupleb.cc
Take care to replace lnbits.stupleb.cc with the correct subdomain and domain name.
This should correctly obtain and store a certificate which lasts for 90 days. Don’t forget to run this again in around 89 days.
We now head back to our nginx config file for LNbits…
nano /etc/nginx/sites-available/lnbits.conf
…and add the https configuration…
server {
 listen 443 ssl http2;
 server_name lnbits.stupleb.cc;

 # SSL settings
 ssl_stapling on;
 ssl_stapling_verify on;
 ssl_session_timeout 1d;
 ssl_session_cache shared:SSL:10m;
 ssl_session_tickets off;

 # Update this with the path of your certificate files
 ssl_certificate /etc/letsencrypt/live/lnbits.stupleb.cc/fullchain.pem;
 ssl_certificate_key /etc/letsencrypt/live/lnbits.stupleb.cc/privkey.pem;
 ssl_dhparam /etc/ssl/certs/dhparam.pem;
 ssl_protocols TLSv1.2 TLSv1.3;

 ssl_ciphers ECDHE-ECDSA-AES128-GCM-SHA256:ECDHE-RSA-AES128-GCM-SHA256:ECDHE-ECDSA-AES256-GCM-SHA384:ECDHE-RSA-AES256-GCM-SHA384:ECDHE-ECDSA-CHACHA20-POLY1305:ECDHE-RSA-CHACHA20-POLY1305:DHE-RSA-AES128-GCM-SHA256:DHE-RSA-AES256-GCM-SHA384;
 ssl_prefer_server_ciphers off;

 resolver 8.8.8.8 8.8.4.4 valid=300s;
 resolver_timeout 30s;

 add_header Strict-Transport-Security "max-age=63072000" always;
 add_header Content-Security-Policy "frame-ancestors 'self';";
 add_header X-Content-Type-Options nosniff;

 # Proxy requests to the socat service
 location / {
  proxy_pass http://127.0.0.1:9082/;
  proxy_http_version 1.1;
  proxy_set_header Host $host;
  proxy_set_header X-Real-IP $remote_addr;
  proxy_set_header X-Forwarded-For $remote_addr;
  proxy_set_header X-Forwarded-Proto $proxy_x_forwarded_proto;
  proxy_set_header Upgrade $http_upgrade;
  proxy_set_header Connection $connection_upgrade;
 }
}
You have three instances where you have to swap out my domain for yours. You then have to make sure that the local port for your socat service is set correctly.
My LNbits is at… LOCAL_PORT=9082
So I have the line… proxy_pass http://127.0.0.1:9082/;
When set correctly, you can…
systemctl restart nginx
Step 5 - Testing and Tidying up the VPS
You should now be able to access the following URLs
https://btcpayserver.yourdomainname.cc
https://lnbits.yourdomainname.cc
You should be able to login to BTCPay Server at that first address with your normal username and password. We’ll come back to this soon.
LNbits too, on visiting the URL, should allow you to create a new account. Don’t. Instead visit your StartOS server UI, click on LNbits and click on Properties.
You should see a list of accounts, or perhaps just your main Superuser account. At the end of each of their URLs you’ll find…
wallet?usr=xxx
This is your secret user ID that lets you access your wallet.
So where https://lnbits.yourdomainname.cc takes you to the page to create new user accounts, https://lnbits.yourdomainname.cc/***wallet?usr=xxx*** takes you into your account.
Take note of this (securely!) and any other user IDs. We’ll use these to lockdown your LNbits.
Visit the URL of your super user. Click on Manage Server on the sidebar, and visit the Users tab. In “Allowed Users” paste each user ID and add them. This prevents other people from being able to create accounts on your now publicly available LNbits service.
Next, head to the Security tab. Should you have known fixed internet IP addresses, you might want to limit access to just those IPs. Other options are worth examining and discussing with LNbits.
Assuming you’ve already correctly set up BTCPay Server, there’s little to do here right now.
Now try accessing…https://yourdomainname.cc
Your domain name will likely display an error, because it has nothing set up. Let’s quickly set up something basic. Later you can think how you might want to use this.
mkdir -p /var/www/stupleb.cc/html
Replace my root domain for yours.
chown -R $USER:$USER /var/www/stupleb.cc/html
chmod -R 755 /var/www/stupleb.cc
nano /var/www/stupleb.cc/html/index.html
Add…
<!DOCTYPE html>
<html>
 <head>
  <meta charset="UTF-8">
  <meta name="viewport" content="width=device-width, initial-scale=1.0">
  <title>Hello, World!</title>
  <style>
   /* Add some basic styles for better presentation */
   body {
    font-family: Arial, sans-serif;
    text-align: center;
    margin: 50px;
   }
   h1 {
    color: #333;
   }
   </style>
  </head>
 <body>
  <h1>Hello, World!</h1>
  <p>This is a basic HTML page.</p>
 </body>
</html>
Ctrl-o, ctrl-x
chown -R $USER:$USER /var/www/stupleb.cc/html
Now, to have nginx serve this, we need to yet again set up a config file.
nano /etc/nginx/sites-available/stupleb.cc.conf
Add…
server {
 listen 80;
 server_name stupleb.cc;

 # Let's Encrypt verification requests
 location ^~ /.well-known/acme-challenge/ {
  allow all;
  root /var/lib/letsencrypt/;
  default_type "text/plain";
  try_files $uri =404;
 }
 # Redirect everything else to https
 location / {
  return 301 https://$server_name$request_uri;
 }
}
then…
ln -s /etc/nginx/sites-available/stupleb.cc.conf /etc/nginx/sites-enabled/
systemctl restart nginx
And let’s get a certificate.
certbot certonly --agree-tos --email youremail@yourdomain.cc --webroot -w /var/lib/letsencrypt/ -d stupleb.cc
Back in
nano /etc/nginx/sites-available/stupleb.cc.conf
Add…
server {
 listen 443 ssl http2;
 server_name stupleb.cc;

 # SSL settings
 ssl_stapling on;
 ssl_stapling_verify on;
 ssl_session_timeout 1d;
 ssl_session_cache shared:SSL:10m;
 ssl_session_tickets off;

 # Update this with the path of your certificate files
 ssl_certificate /etc/letsencrypt/live/stupleb.cc/fullchain.pem;
 ssl_certificate_key /etc/letsencrypt/live/stupleb.ccprivkey.pem;
 ssl_dhparam /etc/ssl/certs/dhparam.pem;
 ssl_protocols TLSv1.2 TLSv1.3;

 ssl_ciphers ECDHE-ECDSA-AES128-GCM-SHA256:ECDHE-RSA-AES128-GCM-SHA256:ECDHE-ECDSA-AES256-GCM-SHA384:ECDHE-RSA-AES256-GCM-SHA384:ECDHE-ECDSA-CHACHA20-POLY1305:ECDHE-RSA-CHACHA20-POLY1305:DHE-RSA-AES128-GCM-SHA256:DHE-RSA-AES256-GCM-SHA384;
 ssl_prefer_server_ciphers off;

 resolver 8.8.8.8 8.8.4.4 valid=300s;
 resolver_timeout 30s;

 add_header Strict-Transport-Security "max-age=63072000" always;
 add_header Content-Security-Policy "frame-ancestors 'self';";
 add_header X-Content-Type-Options nosniff;

 # Proxy requests to the socat service
 location / {
  try_files $uri $uri/ =404;
 }
}
This time, instead of to the socat service, we’ll send people to the directory with a file to serve. Restart nginx and you’re done.
Step 6 - Lightning Address and zapping
Let’s now set up your lightning address with your domain!
Visit you BTCPay Server over clearnet and login, so that you’re at https://btcpayserver.yourdomain.cc
In the sidebar, click Lightning Address.
Click to add an Address.
That’s it. From a lightning wallet that supports lightning addressing you’ll now be able to send yourself funds.
According to BTCPay Server devs, you’d only need to add your lightning address in your nostr client to enable zaps, but at the time of writing, some people still had problems. I did, so visited Manage Plugins and installed the legacy Nostr plugin.
To this, I re-stated the lightning address, adding my public key (npub) and added my private key (nsec) so that BTCPay Server can publish events as me. Importantly, in the section just below that, I also added my StartOS Nostr relay. This means confirmations of zaps can be published to my relay. While here, I added a few more relays I use, including my paid ones.
Now people will be able to zap your notes in nostr and the sats will go straight to your node! And notifications should appear in your nostr client.
![]() Even though we’re now running BTCPay on clearnet, it’s obviously still routing through Tor, with all that this entails. Many nostr clients and custodial wallets don’t expect it to take more that a couple of seconds to generate and send back an invoice, so they sometimes fail when waiting for your invoice to travel back over Tor. It’s usually fine, but bad Tor weather can be a problem. Technically it’s their failure, not yours, as they clearly prefer to be doing internal database accounting rather than actual lightning payments.
Even though we’re now running BTCPay on clearnet, it’s obviously still routing through Tor, with all that this entails. Many nostr clients and custodial wallets don’t expect it to take more that a couple of seconds to generate and send back an invoice, so they sometimes fail when waiting for your invoice to travel back over Tor. It’s usually fine, but bad Tor weather can be a problem. Technically it’s their failure, not yours, as they clearly prefer to be doing internal database accounting rather than actual lightning payments.
Note: the reason for using BTCPay for zaps instead of LNbits is so that zaps go into my LND node balance instead of into a separate LNbits segregated account.
Step 7 - Bolt Cards and tapping
Now that we have LNbits exposed on clearnet, we can write clearnet URLs to Bolt Cards!
In Europe I was gifted a few Bolt Cards from CoinCorner, but another very popular option are Laser Eyes Bolt Cards.
You’ll need an Android phone with NFC compatibility for this step.
Let’s start!
Via your clearnet domain and connection to LNbits, login to your LNbits account on your desktop computer. Add some sats to play with.
On the right, you’ll see Export to Phone with QR Code with an arrow to expand. Click on that to view your QR code (basically just your user ID).
With a QR reader on your phone, scan the QR code to open a copy of the same wallet in your phone’s web browser. (Alternatively, get the URL of the same wallet and open it on your phone some other way - maybe copy and paste in Signal, or log into your main Start9 UI and access via there.)
![]() You’ll likely need to do this with Chrome as it has the ability to talk with the NFC hardware without extra configuration. Apparently Firefox will get this functionality, but I don’t know what the status of that is.
You’ll likely need to do this with Chrome as it has the ability to talk with the NFC hardware without extra configuration. Apparently Firefox will get this functionality, but I don’t know what the status of that is.
In LNbits, in the same account on your phone, go to Extensions. Find, install and enable Bold Cards.
Open the extension.
Click to add a new card (the plus button).
Select your wallet, add any limits you want to impose and give the card a name. My cards have different designs, so I call them by what they have on the front.

Finally tap the little NFC chip icon. It will ask you to tap the card on the back of your phone, which will enter the unique ID in that field next to it.
Click on Create Card.
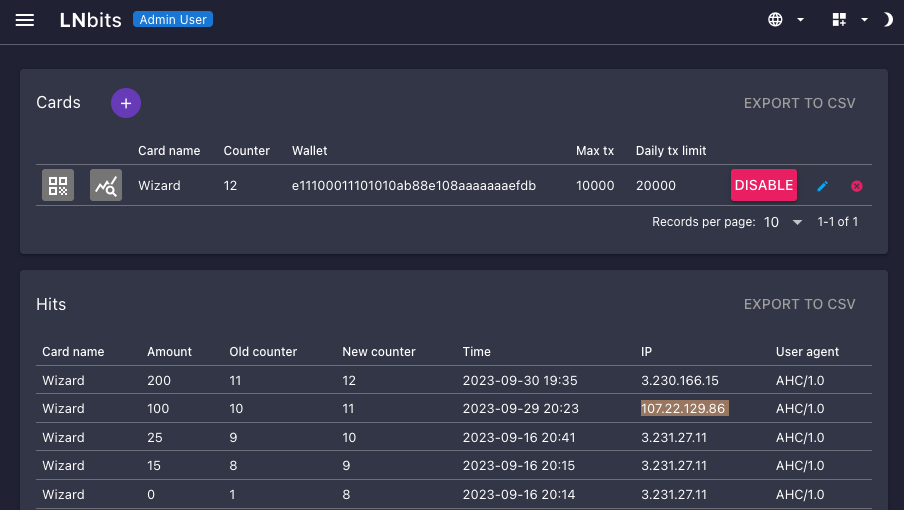
Back on your desktop machine, click into Bolt Cards. Now that LNbits has a physical card attached to it, in the list of cards, click on the QR code icon next to the one you just created. A QR code will be shown. Keep this open.
Next, back on your phone, find and download the latest Bolt Card NFC app, either from the Google Play store or your preferred alternative. The app is from Ones and Zeros Technology.
At the bottom, click “Create Bolt Card”, which may already be open, then click “Scan QR Code”.
Scan the QR code on your desktop machine. You should see among the details scanned you clearnet domain name.
Click “Write Card Now”. Then tap your card.
That’s it. The card is created and linked to your LNbits.

Using Breeze or Wallet of Satoshi, we can now pretend we are a merchant with a point of sale device.
Open your wallet, create an invoice, tap your card on the back of your phone to pay it.
